Category Archives: Nail Art
Happy May day peoples!
It’s the start of a new month and that can only mean on thing – the start of a new NAIL CHALLENGE!
You will see from yesterday’s post that Californails has produced a brand new set of themes for May. I love her challenges the most as they are easier to fit in as the posts are a few days apart. If you’ve never attempted a challenge before I would definitely encourage you to give it a go. You may have some nail fails along the way but it will encourage you to try new things and push yourself.
As always I will start this challenge all guns blazing – I’m sure with your encouragement and feedback I can definitely finish this time! My May isn’t looking too hectic so far so I have no excuse to lapse this time! Wish me luck!
Anyway, today I did a little sponging and a quick freehand design to create some Sunflower nails. I got my inspiration from this beautiful Rodarte dress. One of my all-time favourite nail artists is Miss Ladyfinger – who transforms her favourite fashion pieces into nail art. So I thought this time I’d try my hand at doing just that.

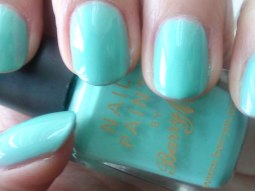
I started with a base colour of Barry M Mint Green.
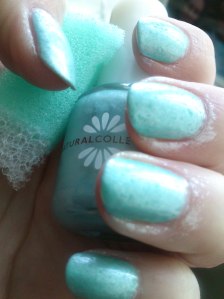
Then I sponged on an icy, blue shimmer by Natural Collection. I got this way back when and it has no name on the bottle so unfortunately I can’t share exactly what this is (sorry!) but any metallic light blue will do. I used the sponging to try and recreate that crimped satin effect.
After clean-up (a chunky brush and some acetone swiped around the nails) I used a bright yellow and dark brown for the sunflower, with a highlight of gold. Then an MUA khaki green for the leaves.

Whenever I do a nail art manicure I struggle to find colours that are similar enough to look part of the same picture, without overpowering each other, and also different enough to have clear definition and clean lines. This was definitely true for this shimmery mix of pastels and brights – I wasn’t too happy with the finished look but was glad I had at least gave it a go.
Once again these picture were taken on my phone so apologies about the quality. I was keen to get the post up this evening and in time for the first day of the #NAILARTMAY challenge.
I love taking nail art inspiration from different places. So tell me, where do you find your nailspirations?
Neon Dry Brush Manicure
Hello lovelies,
My post today is all about the summer-soaked polish of the season – Neons!
If I’m brutally honest (unfortunately this is often my default position) I have never been a huge fan of neons. Don’t get me wrong I love colourful polish but my aneamic white skin is almost transparent and the addition of neon on my nails just highlights the fact.
However, I wanted to show you my neons this week for two reasons.
Reason one: It’s an experiment. As you’ll see from my Weekly WANT a few weeks ago, I am lusting after the new Polish for Tans collection from ModelsOwn but was worried my neon aversion could not be overcome. Until I saw an awesome review on Fee’s Make Up Savvy blog! Now I desperately want them, and as soon as my self-enforced No-buy is over they will be mine!
Reason two: I joined a lovely FB Group called Nail Art Hangout. It’s pretty much as you’d expect. Lots of lovely ladies chatting about nail art (what’s not to like?) I like joining groups like this as in my ‘real world’ there aren’t many people as lacquer-focused as you internet peeps. So I can talk as long as I like about polish without the eye-rolls (common place among family and friends). The theme the group has chosen this week is NEON!
My choice to do a dry brush mani was also twofold. I wasn’t brave enough to have a whole nail of neon and also I’ve seen this technique A LOT lately and really wanted to give it a try myself. And if you want to see a stunning example of dry brush check out Nicole’s at Nail Polish Wars ‘Oil Slick‘. It totally blew me away.
So, for my manicure I started with a white polish base. I used a Next Cashmere polish but any white will do.

Then I used BarryM Pink Flamingo; brushing as much excess polish as possible into the inside of the neck of the polish bottle (and also a little onto an old magazine, to ensure the brush was really dry!)
Then you streak across each nail, working the brush in a different direction on each finger for a less uniform look.

Earlier I said I haven’t many neon polishes – sad but true – so I cheated a bit on this next bit and teamed the pink with a lovely popping purple from Jessica Nails called Purple Burst. This is genuinely one of my all-time favorite purples and I am guaranteed to get positive comments whenever I wear it.
Using the same ‘dry-brush’ technique I decided to streak the purple in the same direction alongside the pink.

This picture really shows how bright these polishes are side by side
When I had finished I decided I loved the 80’s grunge effect so much I’d try and enhance it with a matte topcoat (here I used Nails Inc’s Westminster Bridge but any matte will do)

You’ll love this nail art if:
You want something quick and easy. No waiting between coats, no precision work and even the matte coat at the end is super fast drying!
What do you think? Will you be trying out this manicure? Are you a neon fan?
Happy Easter
Hope you all have a wonderful Easter. Just thought I’d share a quick picture of my Easter mani using the foil from my eggs 😉 You like?

Do you partake in pastels?
Spring has most definitely sprung here in the UK. Not only does the sun shine on my way home now but the blighter now peeps through the curtains in the morning to wake me before the alarm clock. I much prefer to be woken by the sun than the loud din of my annoying phone alarm. Plus these light nights mean I am able to get out in the evenings and make the most of the long days – roll on summer I say.

Whenever I think of spring, I think of pastels. Every polish brand will bring out their own pastels collections come spring but I must admit I am not a huge pastels fan. Perhaps because I’m so pale and feel they just wash me out. However, it’s been a few weeks since I did some freehand nail art so I fell back on the tried and tested rose manicure.

This was the kind of nail art I started with and it’s so super easy a step-by-step tutorial seemed unnecessary. Although I understand that some people feel apprehensive at starting anything creative without a guide so I’ve done a quick ‘how to’ below.

Step 1) Paint your nail with your chosen base colour
Step 2) Apply 5-6 blobs of polish dotten across the nail for the roses
Step 3) Using the nib of your nail art pen (or a small brush) add coils to the dots from the centre out (don’t worry about keeping the lines neat; wibbly lines can look more ‘artistic’ I think)

Step 4) Add leaves to 2-3 of the roses using a small nailart brush
Step 5) Seal the design with a good, quick-dry topcoat

The products I used were:
Ciate Ferris Wheel – a cool pastel blue (3 coats)
Ciate Ivory Queen – for the pink dots
ModelsOwn Nailart pen in White – to add petal details
ModelsOwn Apple Pie – for the pastel green leaves
And here is the final design:

I hope spring has reached wherever you live. Have you swapped your winter wardrobe for your summer one yet? Or more importantly, have you rotated your nail polish for the change in the season?
A new spring creation
Sometimes people ask where to find inspiration for nail art. The obvious place for many is by trawling through Google or Instagram pictures after searching Nail Art. Of course you will find some lovely pictures of nails but I genuinely think that by pushing the envelope you’ll get a lot more satisfaction from your finished manicures, and despite a few major fails, you may well end up with something a lot more unique.
My inspiration for today’s manicure was threefold;
-
I wanted to do something bright and cheery for spring (it does feel like summer is almost upon us now and that is definitely something worth celebrating)
-
I bought some metal embellishments a few months ago and had yet to try them out
-
The real inspiration however came from postings by http://www.sparkylies.co.uk/ She makes the most beautifully adorned phone cases; full of all kinds of glittery, geeky, girliness!
I love all her cases and wanted to create something just as OTT on my nails (yes, I did get a comment or two in work about these nails)
So now, let’s get on to the nails.
For the base coat I used Model’s Own Banana Split from their Fruit Pastels collection. I wanted something cheery but not too overpowering so a yellow pastel seemed to fit the bill nicely.

I then poured on the kitsch with yellow and blue sequin hearts, mini-crystals and mini pearls. Then for the icing on the cake I topped my ring finger with a beautiful gold Unicorn embellishment which I bought from http://www.she-sells-seashells.co.uk/ (she not only sells seashells but also bird cages, anchors, DINOSAURS! and more) All the pieces where placed onto freshly painted clear topcoat and then secured further with another liberal coating over the top. (My first choice of topcoat for nail art is always SecheVite but as my last bottle died I may well move on to something different next time – I hear HKGirl is good, has anyone else tried it?)

I was careful when removing my unicorn not to pull and damage the nail but to let it slip off of it’s own accord once the acetone had worked it’s magic (regular nail polish will of course work just as well but I just get a bit impatient waiting). By doing this it means I can use him again and again as he was totally unharmed.

So tell me honestly, do you like? Is this something you would wear? Would you be able to wear it at work?

